SkyNet Carnival
By: Lorenzo Donati
Main info
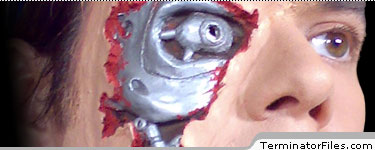
First of all... I think I'm lucky to live in a little Italian town where Carnival is the most awaited and appreciated "village fair", otherwise I've never thought to realize and wear a "damaged T-800" make-up. Soo, in this town, during the whole Carnival week, we are all (men, women, kids, oldies and even our cats and dogs) used to go around masked as it would be "Halloween" or a comic/satiric show: quite strange but it is!
Modelling
A long time ago I realized, with some help from my father, a plaster calque (positive) of my face. Unfortunately I do not have any photographic documentation available of that process. Anyway... one can find lots of users' videos online (simply use 'alginate' as a keyword to find some howto's online). A calque (positive) of your face is needed because otherwise, as it sounds logical, your mask will not fit your own face!
I started to apply 'plasticine' on the calque positive, trying to model the T-800 damaged skin. This was done with a lot of reference images from the movies and (fan)websites. For the detailing, I used professional wood cutting instruments. There are special instruments available in stores, but this also works very well.
Calque
Since the final makeup application is another positive that fits ones face, we need to create a negative of the face. I placed the positive calque with its plasticine mask into a wooden box.
I've spread a thin layer of plasticine over the entire half of my damaged face calque to avoid liquid plaster directly attaching itself to the plaster calque... since that would compromise the entire detaching process. I've also placed a plasticine wall along the central line of the calque: I didn't need the other half.
After all those precautionary operations I've poured the liquid plaster (chalk powder mixed with water) then waited for it to dry. When it was dry I opened the wooden box and detached the two plaster (negative and positive) calques.
Latex
When my negative plaster calque of the mask was done and cleaned from plasticine, I could pour the liquid latex into it. This operation is quite delicate, because you have to let the plaster calque move and rotate in circles while puring the latex to let it fit in all places. And you also have to make the total latex cover only thin layers, without letting it become too thick, specially at the edges.
Latex smells bad while in liquid state, so the operation is even more delicate.
Colouring
When the latex was dry, I detached it from its plaster calque. My prosthetic mask was almost done.
I placed it on some paper and started to protect the parts that would become the skin of the makeup prosthetic. Waterproof sticky tape works very well. Then I used a metallic gray spray to colour in the T-800 skull and eye.
Then I removed the tape, inspected the prosthetic and then started colouring the skin tones and blood tissue surrounding the skull.
Make-UP!
The make-up was probably the worst part of my work, as I had to attach the mask all by myself through a mirror and using one eye only!
I used a professional skin glue to attach the latex mask to my face, then some liquid latex itself to hide the edges of the mask. That's probably the most difficult operation of all.
Then, when the final shape was done and dry, I coloured the mask skin, as well as my real, trying to make them both appear the same colour.
This was the result. Hope you enjoy it.
Images
Check out some images from this FanProject.
Left click to open gallery interface and/or right click to save.


